Sales
In BridgeBills, the sales module is an important part which helps businesses to manage their sales transactions more effectively and efficiently.
Sales Module includes the following features:
Customer
Customers are the prime member of every business. This module helps you to create and maintain the customer details effectively.
Here are the Steps to Add a New Customer in BridgeBills.
- Step 1
- Go to Sales → Customer → New Customer and you will get a list of subsegments
to be filled.

- Step 2
- First part is General wherein you need to fill in the details like Type ie Business or Individual,Customer Name in English and Arabic,Company Name,Currency,Currency Rate,Business Type,Email,Phone. Enable VAT if applicable and mention the credit limit,credit period of the customer.
- Step 3
- Contact & Communication
Enter the address details of the customer in English and Arabic.
Communication part must be filled with the Name,Email,Mobile,Phone.
Multiple communication details can be added with the “Add Communication” button.
- Step 4
- Fourth and Fifth Parts are Document and Banks Respectively.Multiple data can be added and removed as per the requirement
To modify the entered data, click on Clear button.
Final step is to click on Save.Save and new option is available in the dropdown to add a new customer along with saving the current data.
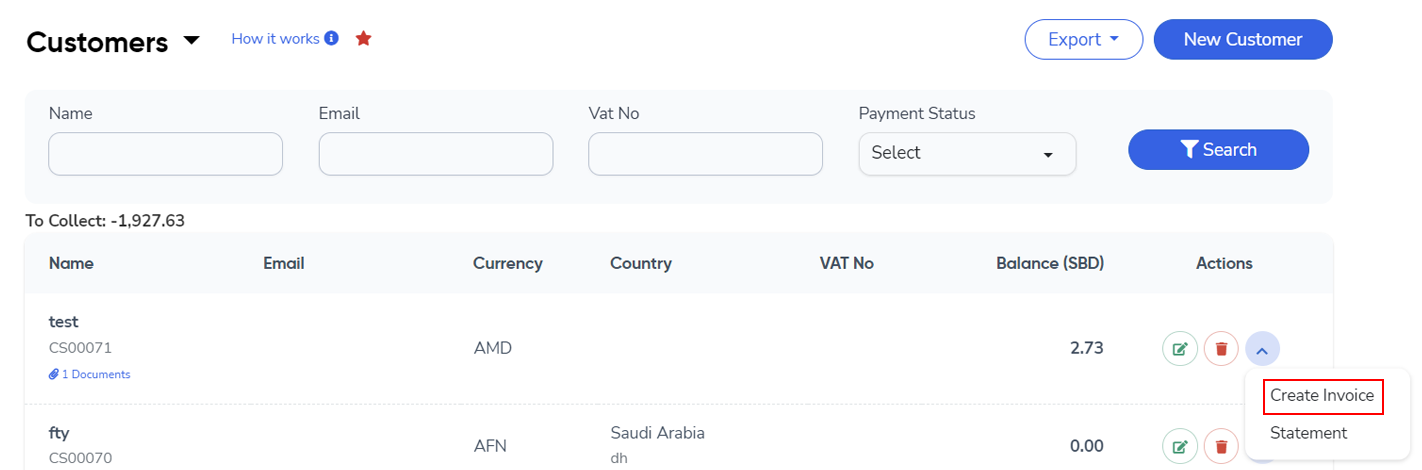
Clicking on Customers switches back to the customers list page. You can filter the customer data by entering Customer Name, Email or VAT No. and click on search.

Actions performed
- Edit/Delete
- Create Invoice
- Statement
Note *
Users are provided with a dropdown to navigate between selected submodules.
The Export Dropdown feature allows users to export the document in Excel
To add a module to the favourites list, click on star.

Customer Statement
This feature in bridgebills allows you to generate reports that summarize a customer's account activity, including all invoices, payments, and credits, over a specific period.
Steps to review the Customer Statement
- Step 1
- Go to Sales → Customer Statement
- Step 2
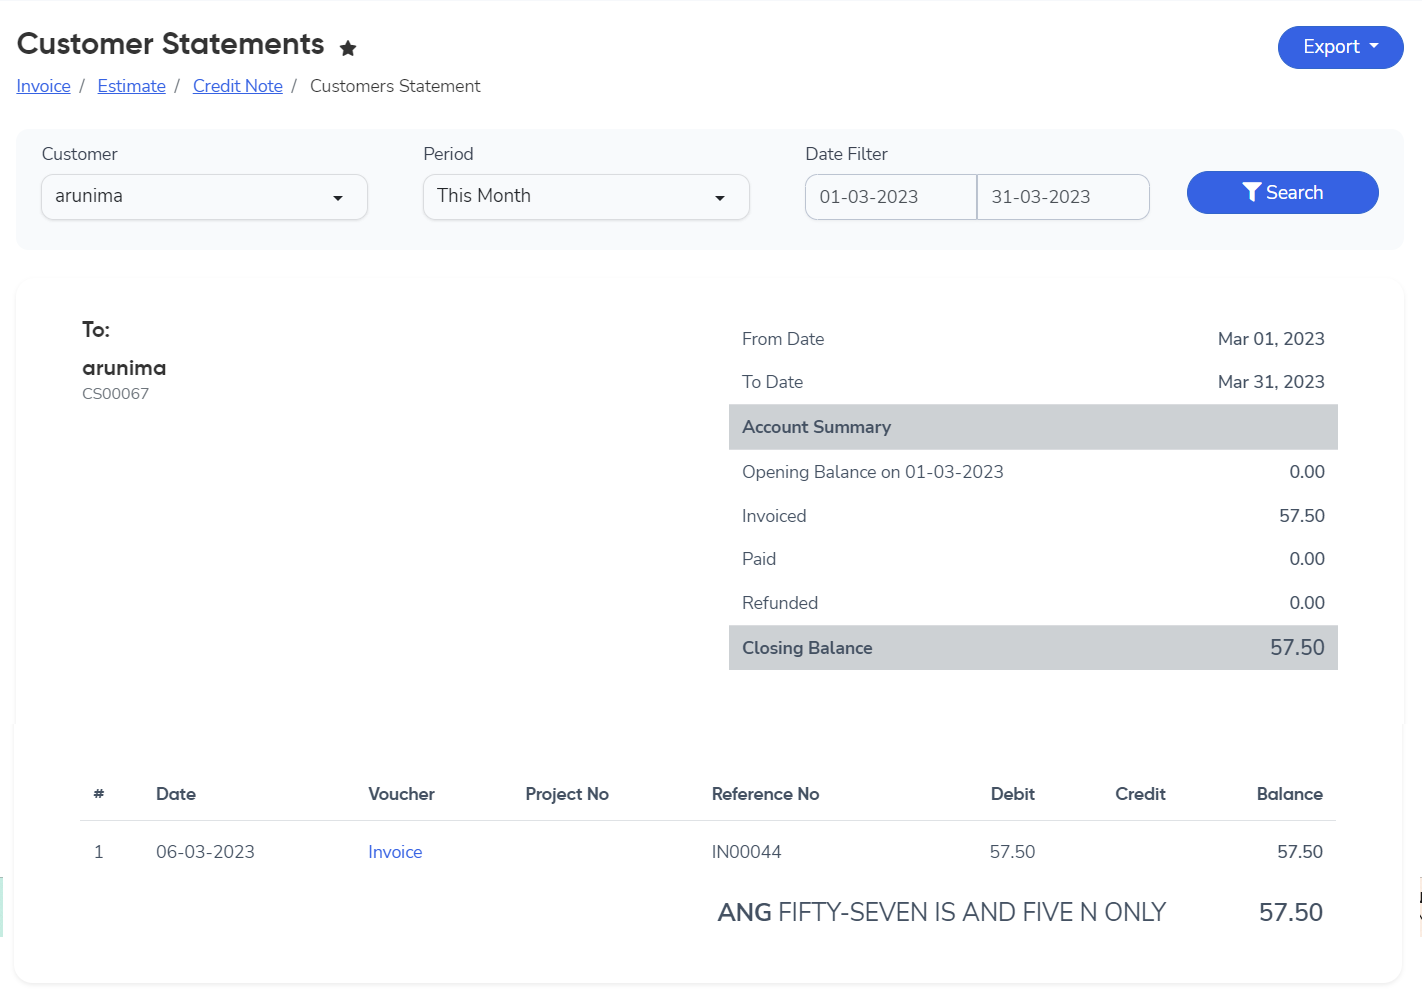
- Select the Customer and the period or choose date from the custom date filter.
Click on Search once all the required fields are filled.
Account Summary column displays the OpeningBalance, Invoiced Amount, Paid amount ,Refunded and Closing Balance.
Table displays Date, Voucher, Project Number, Reference Number, Debit,Credit and Balance.
Note *
We have provided the submodules of the Sales module for easier navigation.
The Export Dropdown has options like Print, PDF,Excel,Mail.
Sales Order
A Sales Order is a document generated by a business in response to a customer's request for products or services.
Here are the general steps to create a Sales Order in Bridge Bills.
- Step 1
- Go to Sales → Sales Order → New Sales Order

- Step 2
- Enter Customer Information
Click on +Add Customer and choose the required Customer from the drop down or create a customer from the New Customer option
Mention the Sales Order Date, Tax Type and Reference.
The currency exchange rate column displays the exchange rate for the currency selected when the customer was created.
Click on Add attachment to attach any documents If required.
- Step 3
- Enter Product/Service Details
Select the item from the dropdown or create an Item by selecting the New Item option from the drop down.Other details like Account, Type, Rate and VAT will be auto-fetched.
Quantity and Discount can be added as per requirement.
More items can be added by clicking on Add an Item.
Enter the Email to which customer would like to receive the Sales Order.
- Step 4
- Summary of Charges
Total amount without VAT and total VAT amount will be displayed. Enable Auto round off to keep an intact amount with VAT.
- Step 5
- Terms of Service and Saving Options
Notes and terms of service can be added if any, which will be displayed on the Sales Order. Footer option can be used for additional information or notes.
Final step is to click on Save. Save and new option is available in the dropdown to add a new Sales Order along with saving the current data.Also with Save and Mail option, you can email the Sales Order to your customer.
Clicking on Sales Order switches you back to the Sales Order list.
Enter the Sales Order Number, Customer, Sales Order Date(From and To Date ) or Type and click on search to get the details of the Sales Order.
Actions performed in Unapproved/Approved Sales Order
- Edit/Delete
- Approve/Disapprove
- Download
- Replicate
- Send Mail
- Convert to Invoice
Note *
Users are provided with a dropdown to navigate between selected submodules.
Apart from the switching option in the dropdown we have also listed the submodules of the Sales module for easier navigation.
The Export Dropdown feature allows users to export the document in Excel.
To add a module to the favourites list, click on star.
Proforma Invoice
A proforma invoice is a provisional invoice, provided by a seller to a buyer before the actual goods or services are delivered.
Here are the general steps to create Proforma Invoice in Bridge Bills.
- Step 1
- Go to Sales → Proforma Invoices → New Proforma Invoice

- Step 2
- Enter Customer Information
Click on +Add Customer and choose the required Customer from the drop down or create a customer from the New Customer option
Mention the Invoice Date, Due Date,Tax Type and Reference.
The currency exchange rate column displays the exchange rate for the currency selected when the customer was created.
- Step 3
- Enter Product/Service Details
Select the item from the dropdown or create an Item by selecting the New Item option from the drop down.Other details like Account, Type, Rate and VAT will be auto-fetched.
Quantity and Discount can be added as per requirement.
More items can be added by clicking on Add an Item.
- Step 4
- Summary of Charges
Total amount without VAT and total VAT amount will be displayed. Enable Auto round off to keep an intact amount with VAT.
- Step 5
- Terms of Service and Saving Options
Notes and terms of service can be added if any, which will be displayed on the Proforma Invoice. Footer option can be used for additional information or notes.
Final step is to click on Save. Save and new option is available in the dropdown to add a new Proforma Invoice along with saving the current data.
Clicking on Proforma Invoice switches you back to the Proforma Invoice list.
Enter the Invoice Number, Customer, Status or Date(From and To Date ) and click on search to get the details of the Proforma Invoice.
Actions performed in Unapproved/Approved Proforma Invoice
- Edit/Delete
- Approve/Disapprove
- Download
- Send Mail
- Convert to Invoice
Note *
Users are provided with a dropdown to navigate between selected submodules.
Apart from the switching option in the dropdown we have also listed the submodules of the Sales module for easier navigation.
The Export Dropdown feature allows users to export the document in Excel.
To add a module to the favourites list, click on star.
Invoice
Bridge Bills allows businesses to create and send invoices to their customers quickly and efficiently. Let’s look at the steps to create an invoice.
New Invoice can be created in 3 methods.
- Step 1
- Go to Sales → Invoices → New Invoices
- Step 2
- Enter Customer Information
Click on +Add Customer and choose the required Customer from the drop down or create a customer from the New Customer option
Mention the Posting Date, Due Date and Reference. Currency exchange rate column displays the currency chosen at the time of creation of the selected customer.
Click on Add Project, to choose the project from the drop down or create a project by selecting the New Projectoption and Click on Add attachment to attach any documents If required.

- Step 3
- Enter Product/Service Details
Select the item from the dropdown or create an Item by selecting the New Item option from the drop down.Other details like Account, Type, Rate and VAT will be auto-fetched.
Quantity and Discount can be added as per requirement.
More items can be added by clicking on Add an Item.
Enter the Email to which customer would like to receive the Invoice.

- Step 4
- Summary of Charges and Payment Status
Total amount without VAT and total VAT amount will be displayed.
Enable Auto round off to keep an intact amount with VAT.
If payment is received from the customer,enable mark as fully paid and enter the payment account.

If you have received a partial payment,enter the amount received and payment account. Balance amount will be displayed.

- Step 5
- Terms of Service and Saving Options
Notes and terms of service can be added if any, which will be displayed on the Invoice. Footer option can be used for additional information or notes.

Final step is to click on Save. Save and new option is available in the dropdown to add a new Invoice along with saving the current data.Also with Save and Mail option, you can email the Invoice to your customer.
Clicking on invoices switches you back to the invoice list.
Enter the Invoice Number, Customer, Project, Payment Status or Invoice Date(From and To Date ) and click on search to get the details of invoice for the selected customer.

Methods for Quick Invoice creation are as follows.
- Method 1
- Sales → Customers → Actions → Create Invoice
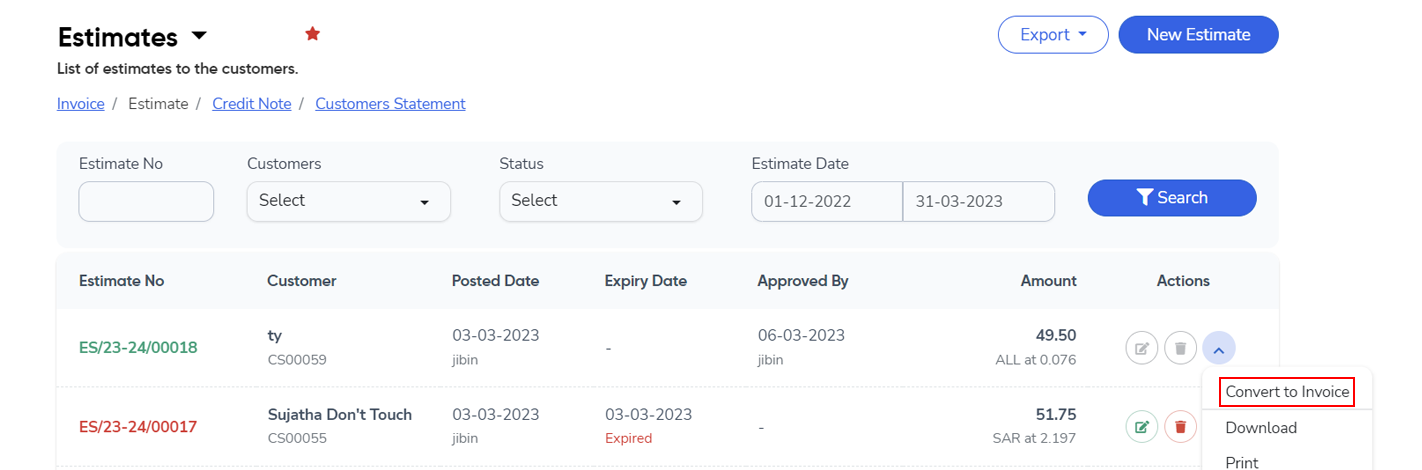
- Method 2
- Sales → Estimates → Actions → Convert to Invoice
Actions performed in Unapproved Invoice
- Edit/Delete
- Approve
- Print/Print Bilingual
- Download/Download Bilingual
Actions performed in Approved Invoice
- Record Collection
- Collection History (Displays the collection recorded)
- Issue Credit Note
- Print/Print Bilingual
- Download/Download Bilingual
- Send Mail
- Recurring (For fully paid invoice)
Note *
Users are provided with a dropdown to navigate between selected submodules.
Apart from the switching option in the dropdown we have also listed the submodules of the Sales module for easier navigation.
The Export Dropdown feature allows users to export the document in Excel
To add a module to the favourites list, click on star.
Estimate
Estimates are similar to invoices but are sent to customers before work begins, to give them an idea of the expected costs.
Here are the general steps to create an Estimate in Bridge Bills.
- Step 1
- Go to Sales → Estimates → New Estimate
- Step 2
- Enter Customer Information
Click on +Add Customer and choose the required Customer from the drop down or create a customer from the new customer provided in the drop down.
Mention the Estimate Date, Expiry Date, Reference. Currency exchange rate column displays the currency chosen at the time of creation of the selected customer.
Click on Add Project to choose the project from the drop down or create a project by selecting the new project option.

- Step 3
- Enter Product/Service Details
Select the item from the dropdown or create an Item by selecting the New Item option.Other details like Quantity, Rate and VAT will be auto-fetched. More items can be added by clicking on Add an Item.

- Step 4
- Summary of Charges and Payment Status
Total amount without VAT and total VAT amount will be displayed.
Enable Auto round off to keep an intact amount with VAT.

- Step 5
- Terms of Service and Saving Options
Notes and terms of service can be added if any, which will be displayed on the Estimate. Footer option can be used for additional information or notes.
Final step is to click on Save. Save and new option is available in the dropdown to add a new estimate along with saving the current data.
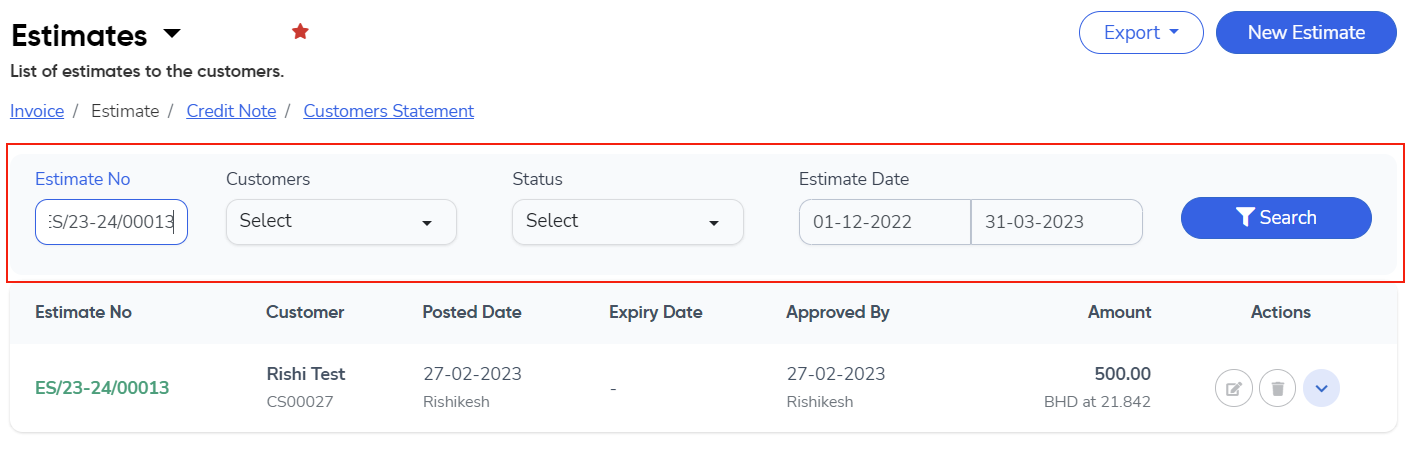
Clicking on Estimates switches you back to the estimate list.
Enter the Estimate Number,Customer,Status or Estimate Date(From and To Date ) and click on search to get the details of the estimate for the selected customer.
Actions performed
- Edit /Delete
- Approve/Disapprove
- Send Email
- Download
- Convert to Invoice
Note *
Users are provided with a dropdown to navigate between selected submodules.
Apart from the switching option in the dropdown we have also listed the submodules of the Sales module for easier navigation.
The Export Dropdown feature allows users to export the document in Excel.
To add a module to the favourites list, click on star.
Credit Note
In BridgeBills, this feature allows you to issue credit notes when a customer returns goods or services, and cancel all or part of an invoice for a variety of reasons.
Here are the general steps to add a credit note.
- Step 1
- Go to Sales → Credit Notes → New Credit Note.
- Step 2
- Enter Customer Information
Select the Customer , Invoice,Posting Date, Reason, Reference. Currency exchange rate column displays the currency chosen at the time of creation of the selected customer.Also project will be displayed, if the same has been selected while creating the Invoice.

- Step 3
- Enter Product/Service Details
Select the item from the dropdown or create an Item by selecting the New Item option.Other details like Income Account, Sales Type,Quantity, Rate and VAT will be auto-fetched.
More items can be added by clicking on Add an Item.
- Step 4
- Summary of Charges and Payment Status
Total amount without VAT and total VAT amount will be displayed.
Enable Auto round off to keep an intact amount with VAT.

- Step 5
- Terms of Service and Saving Options
Notes and terms of service can be added if any, which will be displayed on the Credit Note. Footer option can be used for additional information or notes.
Final step is to click on Save. Save and new option is available in the dropdown to add a new credit note along with saving the current data.

Clicking on credit notes switches you back to the credit note list.
Enter the Credit note Number,Customer or Credit Note Date(From and To Date ) and click on search to get the details of credit Note for the selected customer.

Actions performed
- Edit/Delete
- Approve/Disapprove
- Download
Note *
Users are provided with a dropdown to navigate between selected submodules.
Apart from the switching option in the dropdown we have also listed the submodules of the Sales module for easier navigation.
The Export Dropdown feature allows users to export the document in Excel.
To add a module to the favourites list, click on star.